Posts

Time for a change

Image
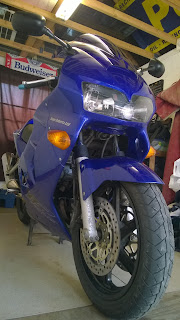
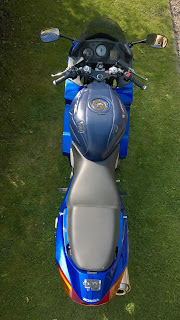
Nobody likes change  After near 4 years of ownership, the RC46 is off to pastures new.  With plans for a Fireblade, I listed the VFR for sale and a good friend decided to take her on. As plans move and change I have decided to make the Babyblade my main road bike for the time being as a car takes temporary residence on the drive in the form of a VW Corrado G60 . I still have another V4 in my life; the VFR750 RC24 FH  track weapon that I continue to race in the CRMC's superstock 750 class so head there for more V4 action. Until another RC46 enters my life, this is the last entry on this blog. thank you for reading.

Forking painting

Image
The fork legs (being a Honda) were grot and needed a paint since I bought the bike.  Suffice to say three years hadn't improved matters. It was time to get the rattle cans out... ...Again Prep wise I: Removed the front wheel. Removed the front calipers and tied them up out of the way. Removed the mudguard, identified it was cracked and set aside. Spent an absolute age cleaning the fork legs. Taped up all of the bits I didn't want to become silver. I didn't bother stripping the old paint back as this is my daily ride not a show bike and I didn't want to loose the casting marks as they help the paint key in. I used some Audi aluminium silver paint which is a touch brighter and more metalic than the paint Honda use but I think looks great. I had used this on my RD headstock in the past which came out great so I had high hopes of it working here too. There was a lot of wind whilst painting resulting in some areas I hadn't t

Taking [Head] Stock

Image
When I firsts purchased the VFR it had a carbon effect cover on the headstoch which looked okay. I however do not like "Carbon effect" and it was a little dog eared so I removed it. This left the standard silver headstock that was showing every day of its age. This had to go Jobs like painting your headstock do take a while to come into effect and it is only now that I decided to give it a go. To get to the headstock I had to: Remove the clutch and brake reservoirs from the clipons. Remove the clipons. Remove the HISS system. Remove the instrument cluster fairing. Partially remove the instrument cluster. Unplug the ignition and free the loom from its tie wrap under the instrument cluster. Partially remove my knuckles doing so. Undoo the headstock nut. Withdraw the headstock with the aid of a hide face hammer. Having successfully killed an hour or two doing that I now had my headstock free. First things first; I cleaned everything metic

Clear and bright

Image
I have wanted a clear brake light on the VFR for a little while. When I decided to crack the original lens whilst placing her on the centre stand (NSR got in the way) I opted to spend a tenner more and bought the clear LED unit to replace it. Fitting is fairly straight forward. Just remove the tail unit, disconnecting the wires to the tail light and then unscrew the two bottom screws and inside pair pictured on the right. The LED brake light unit  I opted for uses connectors that replicate the bulbs you would have normally fitted . The bulb holders you already own however wont fir and you have to use the cut down versions that come supplied with the brake light unit.  Once connected it is the reverse process to fit the new brake light unit and pop everything back together. The indicators have resistors prebuilt in so there is no effect to the indicator flash speed. The new unit looks a lot nicer and when the front indicators get changed it should help slicken up

Dream screen

Image
Dream screen This one is short and sweet as fitting wise there isn't much to say about this. I have had to upload this three times however as it keeps going tits every time I upload it for some reason. I published this a month or so ago but only recently noticed something had gone very wrong with the code causing it to all appear in a three letter column hence why I am republishing. After the horror story that was the Powerbroze screen I really didn't mind getting another. Yes it is a pain in the bum having to buy another screen but every time I look at that bike and see that piece of crap screen sat wonkily on my bike, well, like I said I don't mind replacing it. I opted for an Airblade this time as on the picture it had the lower lugs that slot into the fairing and it is a lighter tint. This would make for a better screen to shoot through should I ever mount a camera behind the screen. The screen arrived only 2 day later and although looking not

Plug and pray

Image
I have delayed submitting this blog as I had hoped to get it all sorted before submitting bt it has been months and I haven't got round to it. I will probably update this one or publish a follow up blog when/ if I ever progress this mod. Having just spend the best part of eight months away from my VFR and  NSR250 MC28 , I had found that buying bits for them made me feel a little less sad. First on my list to fit was a powercommander V (from here on refereed to as pc) that I had picked up second hand off of a chap in the states for £100. Ever since fitting the air filter and exhaust system I have wanted to get one as I knew the fuelling would be off and now I had one that I could just "chuck in". As I'm sure you may be wondering already, I was aware that Dynojet don't make a pc V for the fifth gen bikes only the pc III USB. I had quizzed the guy selling it prior to bidding as the part number was for an 09 VTEC (sixth gen) but he told me he had removed it f

Plug it and go play

Image
Plug it and go play Having spent some more time away from the bike I was left thinking: Sealing the exhaust up hadn't stopped it popping so what was causing it? "Well popping is caused by air getting to the exhaust so either you did a crap job of tightening up the header pipe or it's the PAIR system" I thought to myself. The PAIR valve allows fresh air into the exhaust system to continue the burn of the exhaust gasses on their departure to lower the emissions. This should create no problems with the standard end can but put a straight through can on it and you might get popping and banging on the overrun.  Maybe I needed a step back from the bike to see this but I thought what harm can it do to try? as it happens the task is quite reversible and doesn't cost anything to simply block the system and if it works I might go ahead and remove it completely. PAIR valve isolation With the aid of the Haynes manual and this guide from VFR discussions  I got to